はじめに
Supabase CLIでは期待通りにデータベースが動くことを確認するためにpgTAPを利用したテスト用のSQL文を記述して、ユニットテストを行うことができます。
この機能はRLSが正しく設定されているかのチェックにも便利です。
今回はこれを利用してローカルでのテスティングとCIでPRを出したときにテストを行う機能をそれぞれ作成します。
Supabase CLIでローカル開発環境構築
任意のディレクトリでsupabase initします。
npx supabase initその後そのディレクトリ内でsupabase startしてローカル環境を立ち上げましょう。
npx supabase startローカル開発環境構築について今回は割愛しますが、下記を見ると詳細がわかると思います。
https://supabase.com/docs/guides/local-development/cli/getting-started?queryGroups=platform&platform=windows&queryGroups=access-method&access-method=postgres
テーブル作成
下記コマンドで新規migrationを作成します。
supabase migration new create_employees_table作成されたsqlファイル内で下記を記述しましょう。
これでemployeesテーブルの作成が行われます。
create table
employees (
    id bigint primary key generated always as identity,
    name text,
    email text,
    created_at timestamptz default now()
);加えて、supabaseディレクトリ直下にseed.sqlを追加しましょう。
これでテストデータを追加します。
-- テストデータを挿入
insert into employees (name, email) values
('山田 太郎', 'taro.yamada@example.com'),
('鈴木 花子', 'hanako.suzuki@example.com'),
('佐藤 次郎', 'jiro.sato@example.com');
ここまで出来たらsupabaseのdbをリセットします。
npx supabase db resetローカルのテスト作成
supabase/tests/databaseディレクトリにemployees.test.sqlを追加します。
begin;
select plan(6);

SELECT has_column(
    'public',
    'employees',
    'id',
    'id should exist'
);
SELECT has_column(
    'public',
    'employees',
    'name',
    'name should exist'
);
SELECT has_column(
    'public',
    'employees',
    'email',
    'email should exist'
);
SELECT has_column(
    'public',
    'employees',
    'created_at',
    'created_at should exist'
);

SELECT has_pk('public', 'employees', 'id');

SELECT col_has_default('employees', 'created_at');

select * from finish();
rollback;
テストを作成したら下記を実行してテストが成功することを確認しましょう。
supabase test db成功すると下記のログが出ます。
ok 1 - id should exist
ok 2 - name should exist
ok 3 - email should exist
ok 4 - created_at should exist
ok 5 - id
ok 6 - Column employees.created_at should have a default
ok
All tests successful.
Files=1, Tests=6,  0 wallclock secs ( 0.02 usr +  0.00 sys =  0.02 CPU)
Result: PASS
github actionsでCI環境を作成する
.github/workflowsにci.yamlを作成し、PR時にテストが走るようにしましょう。
こちらのyamlに関しては下記の記事を参考にさせていただきました。
https://zenn.dev/goggle555/articles/242f9c398dda1c
name: CI

on:
  pull_request:
    types:
      - opened
      - reopened
      - synchronize
      - closed
  push:
    branches:
      - main
  workflow_dispatch:

jobs:
  test:
    runs-on: ubuntu-latest

    steps:
      - uses: actions/checkout@v4
      - uses: supabase/setup-cli@v1
        with:
          version: latest

      - run: supabase db start
      - run: supabase db lint
      - run: supabase test db

      - name: Verify generated types are checked in
        run: |
          supabase gen types typescript --local > types.gen.ts
          if ! git diff --ignore-space-at-eol --exit-code --quiet types.gen.ts; then
            echo "Detected uncommitted changes after build. See status below:"
            git diff
            exit 1
          fi
mainブランチにpushして問題なく動くことを確認出来たらOKです。

CI上でのテストを失敗させる
RLSを変更してテストが通らない状況を作ってみましょう。
追加のmigrationを作成します。
supabase migration new remove_name_row作成されたSQLの中でname列を削除します。
ALTER TABLE employees
DROP COLUMN name;seed.sqlも一応修正しておきます
-- テストデータを挿入
insert into employees (email) values
('taro.yamada@example.com'),
('hanako.suzuki@example.com'),
('jiro.sato@example.com');ここまでの修正を別ブランチにしてmainブランチにPRを投げます。
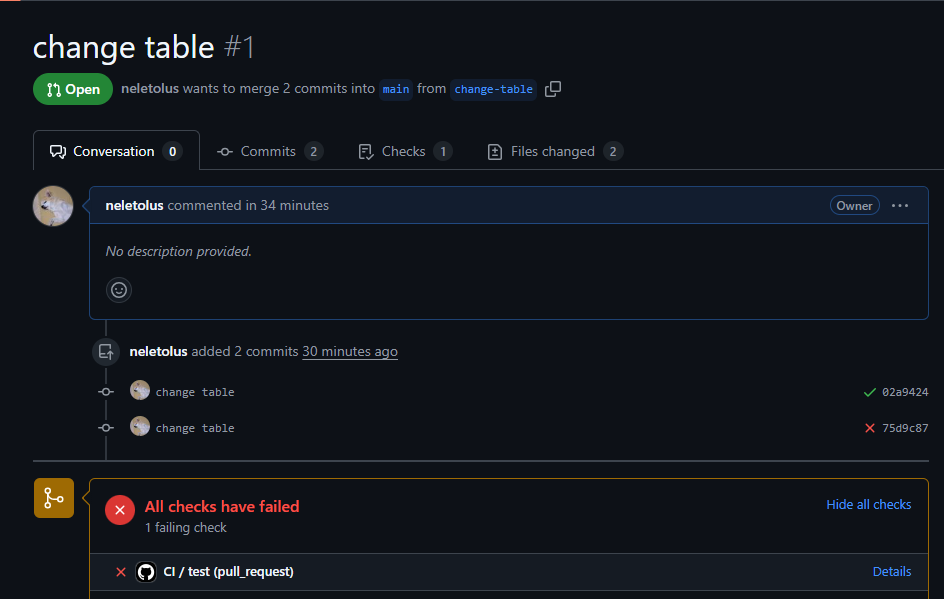
今回はテストが通らなかったのでCIの失敗が表示されています。
もちろんgithubのブランチ保護ルールを設定することでチェックが通らないとマージできないようにすることもできます。
テストを修正して成功させる
下記の通りテストを修正します。
begin;
select plan(5);

SELECT has_column(
    'public',
    'employees',
    'id',
    'id should exist'
);
SELECT has_column(
    'public',
    'employees',
    'email',
    'email should exist'
);
SELECT has_column(
    'public',
    'employees',
    'created_at',
    'created_at should exist'
);

SELECT has_pk('public', 'employees', 'id');

SELECT col_has_default('employees', 'created_at');

select * from finish();
rollback;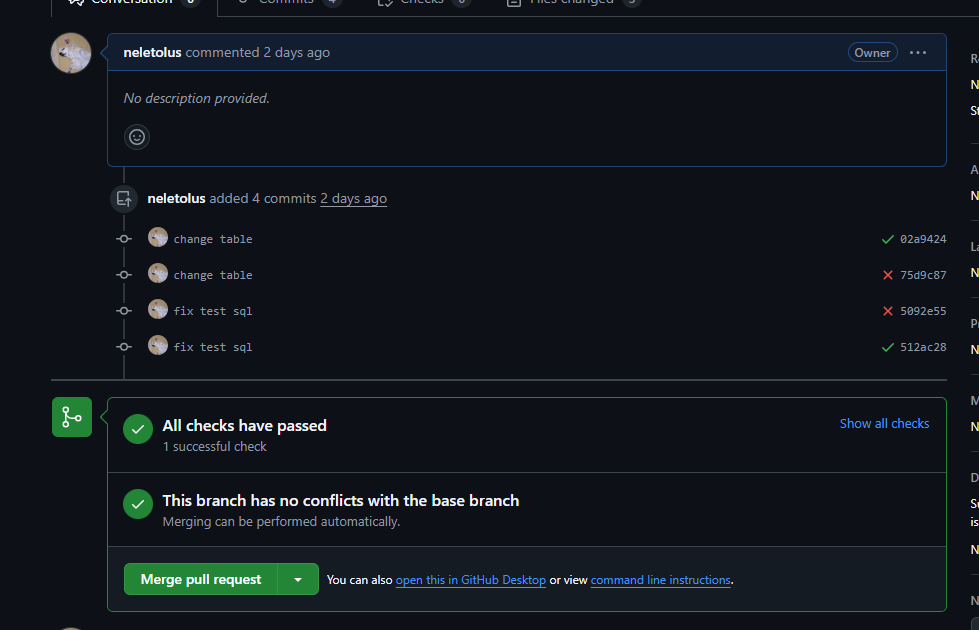
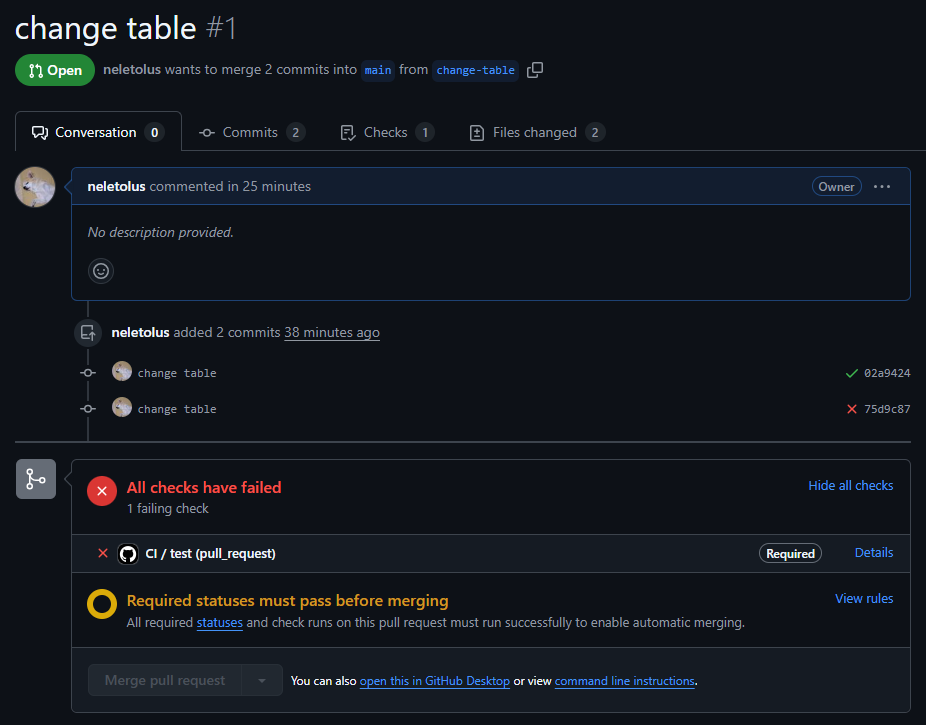
マージできる状況になりました。
まとめ
このようにSupabase CLIのテストを使って安全にサービスの提供をすることができます!
是非試してみて下さい!
参考資料
Testing Your Database | Supabase Docs
GitHub Actionsを活用してSupabaseのマルチステージCI/CDを実現する